Introduction to SoCreate Writer
SoCreate Writer is a tool built for storytellers of any level to express themselves without worrying about formalities. Writer was designed to make the writing process fun and stress-free, creating an immersive and enjoyable environment for creativity to thrive. Whether you're writing your first short film or developing an entire television series, this guide will walk you through every part of the Writer platform, so you can confidently craft stories that shine.
Getting Started
Signing up
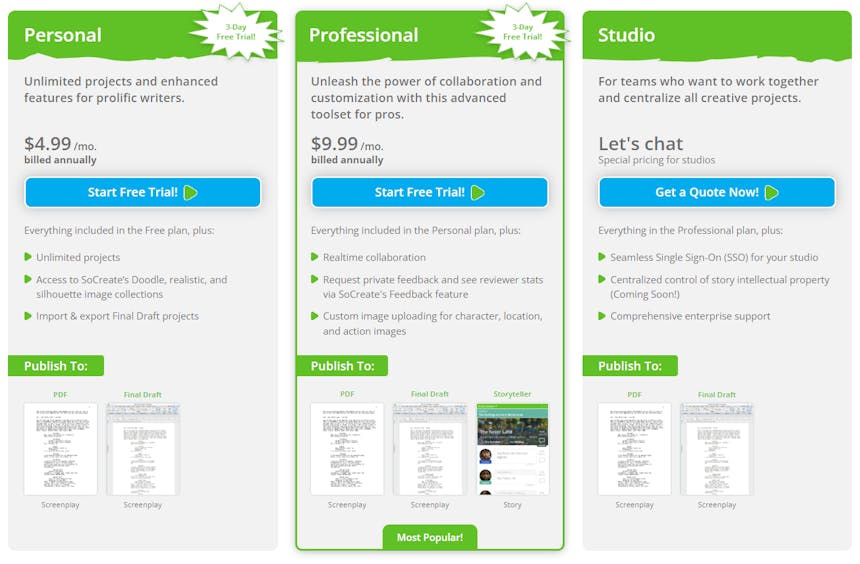
Getting started on SoCreate is easy! To sign up, go to socreate.it and choose the best plan for you. We offer a free 3-day trial and three different paid plans.
- Personal Plan
$4.99/month (billed annually). Includes unlimited projects, access to SoCreate’s Doodle, Realistic, and Silhouette image collections, and the ability to import/export Final Draft projects.
- Professional Plan
$9.99/month (billed annually). Includes everything in the Personal Plan plus real-time collaboration, feedback request tools, custom image uploading for characters, locations, and actions, and full access to SoCreate Publishing.
- Student Plan
$4.99/month (billed annually). Includes all the features of the Professional Plan. Requires a .edu email address to qualify.
- Creating a Movie, TV Show, or Short
Creating a new story from your SoCreate dashboard is simple. Start by navigating to the top of the dashboard, where you'll see options for different story types. Click on “I want to create a new Movie, TV show, Short Film, or Import Story.” After selecting your desired format, a pop-out window will appear, prompting you to enter a working title for your story project. Don’t worry if the title isn’t final, you can always edit it later. Once you’ve entered your title, click “Create Story,” and just like that, a new project with a fresh story stream will be ready for you to begin writing.
- Importing a Final Draft File
To import screenplays from Final Draft into SoCreate, begin by clicking the blue “Import Story” button at the top of your SoCreate Dashboard. From the dropdown menu, select the type of story you're importing, whether it's a movie, TV show, or short film. A preview of your story, as it will appear in SoCreate, will load automatically. SoCreate will automatically match silhouette images to your locations and characters, though you can edit these selections later. Once you're satisfied, click “Import Now.” Your newly imported screenplay will appear on your dashboard, ready to be explored and edited in SoCreate.
Visual Writing Interface
- Title Card (Upper Left Side)
In the upper left corner, you’ll find your title card. It displays your working title, the title card image, a menu button, and a stats button.
To view your story stats, click the button at the bottom right of the title card. It will flip to reveal detailed information. This includes counts of action items, dialogue items, scenes, sequences, acts, films, page counts, and estimated story time.
The three dots located at the top right, just above the menu, open your menu options.
Here, you’ll find several choices: Edit Story Settings, Request Feedback, Change Image, and Include Title Text.
Selecting Edit Story Settings opens a pop-up where you can choose the story type, update the title, write a description, and select options like visual style, narrator’s voice, story genre, and rating. The Request Feedback option lets you invite specific people or the entire SoCreate community to provide feedback on your story. Clicking Change Image allows you to select a new title card image, while the Include Title Text toggle lets you decide whether to display text on your title card.
- Story Toolbar (Left Side)
Beneath the title card, you’ll find the Story Toolbar. This is your gallery of characters and locations. Each time you create one, it’s automatically added here for easy access and organization.
- Tools Toolbar (Right Side)
On the right side of your screen, you will find your Tools Toolbar. Here you can add action, create characters and locations, and add transitions and story structure.
- Main Toolbar (Top)
At the top of your screen will be your main toolbar. Here there are a few options. You’ll find an icon with four horizontal lines on the far left. Clicking it opens a dropdown menu to access your story settings, view available keyboard shortcuts, export or print your story, or tour the interface. You can quickly switch to another recent story, open a story from your dashboard, create a new one, or navigate to the SoCreate Home, Blog, or Company pages. In the center of the toolbar are the Undo and Redo buttons, which let you easily reverse or reinstate your most recent changes. On the far right, you’ll find tools to publish your story, collaborate with others, access support, return to your dashboard, or visit your account settings.
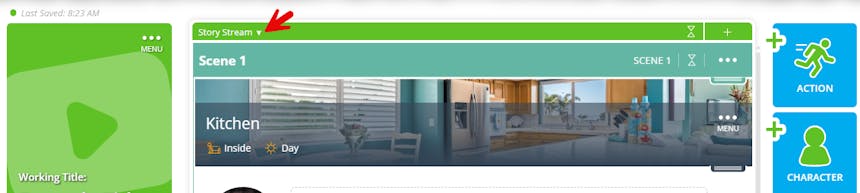
- Stream
Your Story Stream in Writer is where you develop your story. There are two different views in your Story Stream, Story View and Outline View. The Story View is where you will write your story. It includes everything you add, like scenes, action, and dialogue. The Outline Stream is where you build your story’s structure. It is a place to create the framework for your story.
- Multiple Story Streams
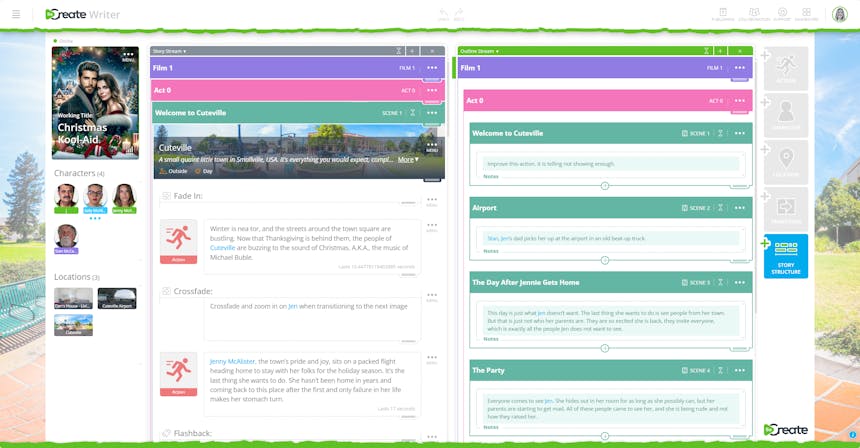
Viewing multiple sections of your story simultaneously is easy with SoCreate’s Additional Story Streams feature. To open a second view, click “+” to the right of your primary stream. Your entire story will populate in this new stream, allowing you to scroll and explore independently from your main view.

- Collapsing Scenes
Next to the “+,” there is a collapse icon. If you press the one at the top, all your scenes will collapse. These same icons are also on each scene bracket, so you can collapse individual scenes as well.
Collapsing your actions, sequences, and scenes lets you view your story structure quickly. It also makes it easy to rearrange scenes using their drag handles and jump around to make quick edits.

- Outline Stream
At the top of your Story Stream, you’ll see a down arrow on the left-hand side. Click it to open your Outline Stream. With just one click, you’ll get a clean, organized view to start building your story’s structure. Add scenes, sequences, acts, and films to create your story outline. Each scene includes an expanded notes section, helping you organize your thoughts as you develop your story.
As you build your outline, you can also build the foundation for writing your story. You can create characters, props, and locations directly within your outline notes. Type the Shift + @ on your keyboard to pop up Quick Add, then choose the asset you want to create. Elements including characters and locations will automatically appear in your Story Toolbar on the left once you’ve created them using Quick Add. When it’s time to write dialogue and action, all your story assets will be ready.
Once your outline is complete and you’re ready to start writing, click the plus (+) button in the green bar at the top of your Outline Stream to open a new Story Stream. This gives you a seamless, side-by-side view of your outline and writing space, so you can reference your notes while writing your story’s dialogue and action, all in one place.
Characters
- Add Characters
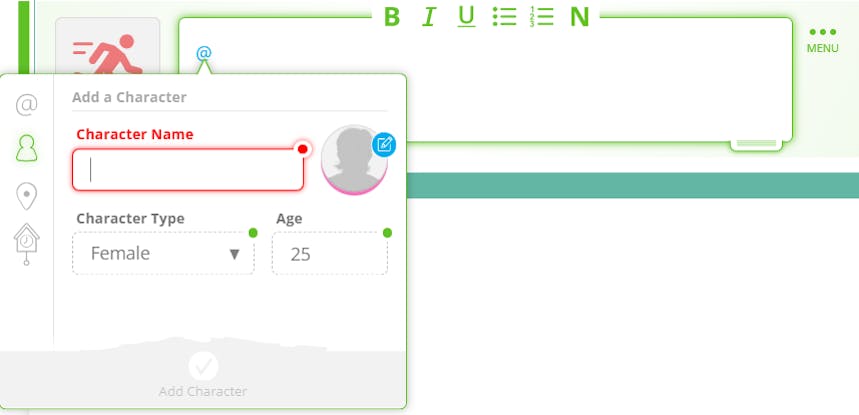
To add a character to your story in SoCreate, navigate to the Tools Toolbar on the right-hand side of your screen and click “Add Character.”
A form will appear where you can enter character details such as name, type, and age. To personalize the appearance of your character, click “Change Image.” You can filter image results by choosing between doodle or realistic styles using the “Filter By” dropdown menu and further narrow your search by typing descriptive keywords about your character’s appearance into the search bar.
Once you find an image that fits, select it and click “Choose Image” at the bottom of the pop-out. Then, finalize the character creation by clicking “Add Character.”
Your new character will now appear in your Story Toolbar and at the location of your cursor in the Story Stream. From there, you can immediately begin adding dialogue for your character.
- Creating Quick Add Characters
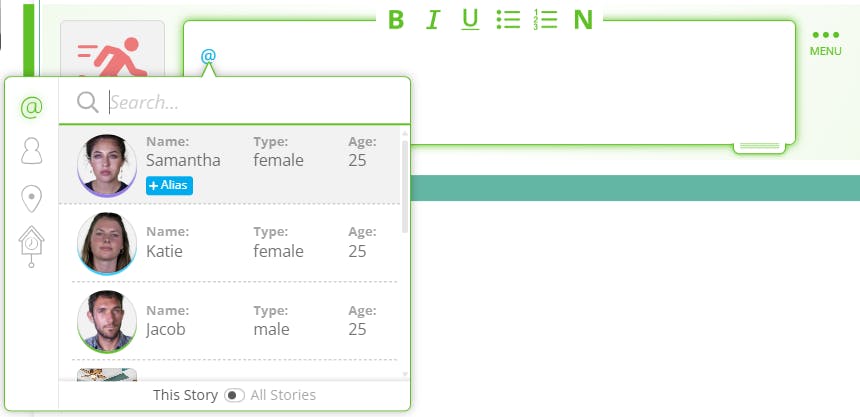
Use SoCreate’s Quick Add feature to rapidly introduce new characters or tag existing ones directly within your script. Type the Shift + @ on your keyboard to activate Quick Add. From there, either click or tab over to the Character icon in the sidebar and begin entering your new character’s details, such as their name, character type, and age.
Your newly created character will now appear in the Story Toolbar for future use and will be automatically highlighted in the Dialogue or Action Stream Item where they were first mentioned.
Writers should tag characters every time they are mentioned in the script. This makes it easy later to see exactly where each character appears throughout the screenplay, or to edit that character’s details on a global level, like their name or appearance. Readers can also hover over a tagged character to view more information about them.
Using @ mentioning for your characters signals to our AI that they may need to appear in the action image. It also helps maintain consistency across your story whenever the character is referenced.
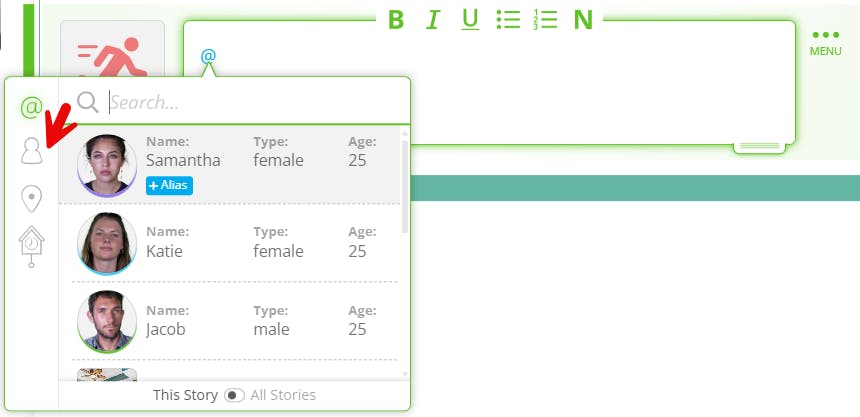
- Tag Characters
To tag a character, navigate to the relevant character or action stream item and type the Shift + @ on your keyboard. A dropdown will appear showing all available characters, select the one you want, and their name will appear in blue text. Tagging characters ensures consistency throughout your story when it’s published into Storyteller.
- Add Appearance, Wardrobe, and Voices
To add details to your character, head to your Story Toolbar and hover over the character you’d like to edit. Click the blue “i” icon, and a pop-up will appear with options to describe the character’s appearance, wardrobe, biography, and even assign them a voice.
You can craft these descriptions exactly as you envision them. Use the appearance, wardrobe, and biography fields to paint a vivid picture that brings your characters to life. For wardrobe, you can go a step further and define specific costumes for different scenes. Just remember that the last described costume will remain on until it's updated again.
Adding these descriptions helps our AI production studio accurately visualize your story assets the way you imagine them. With vivid, cinematic detail, our AI can generate compelling images that resonate with viewers and appeal to future buyers.
Additionally, SoCreate offers a library of over 650 unique voices, allowing you to assign each character a voice that matches their personality and tone. By selecting “Select Character’s Voice,” you can choose how each character sounds in your story. When publishing to Storyteller, if no voice is chosen, our AI will auto-assign one, so to ensure your character sounds how you imagine, it is essential to select voices for each character.
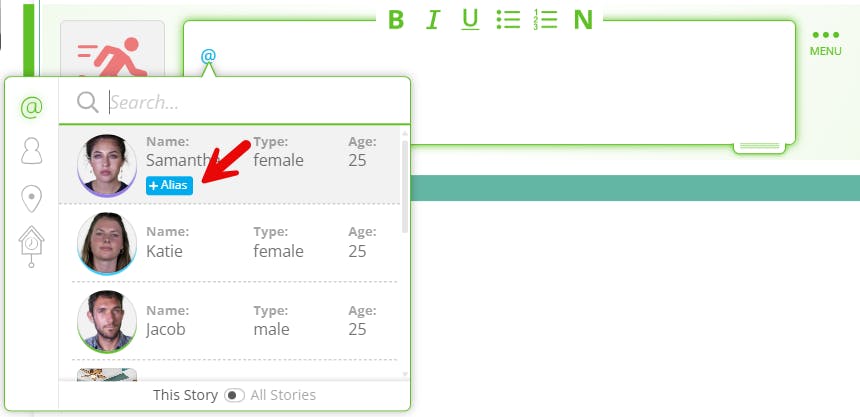
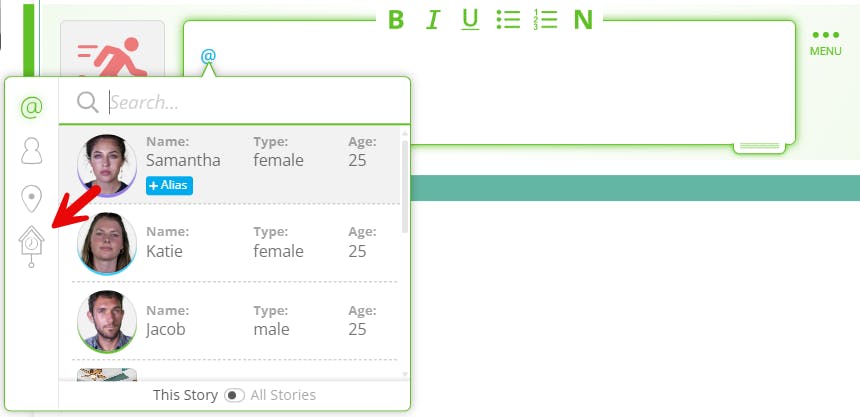
- Aliases
In SoCreate, you can assign aliases to Characters, Locations, and Props to reference them by alternative names while keeping them linked to the original element in your story. This is especially helpful for nicknames, codenames, or variations in how assets (including characters, props, and locations) are referred to across different scenes.
To add an alias, type Shift + @ to bring up the Quick Add feature. Search for the Character, Location, or Prop you want to assign an alias to by typing, scrolling, or using the arrow keys. Once you've located the item, click the blue “Add Alias” button next to it. Type in the new alias name and hit Enter. The alias will appear in blue text within the Dialogue or Action Stream Item where it was mentioned, just like the original name.
You can add as many aliases as you need for each element. To manage existing aliases, hover over the Character or Location in your Story Toolbar, or click on the Prop’s name, then click the three-dot menu icon and choose “Edit.” From there, you’ll be able to view all current aliases, add new ones, or revise or remove existing entries. Any changes you make will automatically update across your entire script wherever that element is @ mentioned, ensuring consistency while giving you the flexibility to reflect how characters and places are naturally referenced in dialogue or description.
Adding aliases is essential for maintaining character consistency in Storyteller. For example, aliases ensure that our AI production studio knows that the character named “Alyson” is the same character who goes by “Ally” and will generate an image in her likeness.
- Character Variation
The Character Variations feature in SoCreate allows you to create multiple visual versions of a single character, keeping your Story Toolbar organized while allowing you to show how a character evolves, whether through age, hairstyle changes, or any other physical detail. These variations are neatly nested under the original character in the toolbar but can be treated as distinct entities within your story.
When you publish your story to Storyteller, variations allow your character to transform accurately, enhancing the visual experience for your audience. For example, if you were writing a script like Forrest Gump, written by Eric Roth and directed by Robert Zemeckis, you could use Young Forrest for his earlier years, Teenage Forrest for his teen years, and Older Forrest for the later stages of his life. SoCreate recognizes the characters as the same, but their appearance and presence are accurately reflected in the story since each variation can be updated with a new appearance, wardrobe, and age.
Each character variation can be inserted directly into the Story Stream, given their own dialogue, assigned a unique voice and unique image, and tagged as their specific version. To add a variation, locate the three-dot menu icon on the character within your Story Stream or by clicking the blue “i” icon in the Story Toolbar. From the menu, select “Add Variation.” Enter a name for the variation and, if needed, update the character’s voice and image to reflect the new version. Once you're done, click “Save Character Variation.”
Your new variation is now ready to use. Access it quickly via the Quick Add feature by pressing CTRL + Enter in the Story Stream, or by clicking the three dots that appear beneath the character in your Story Toolbar. There’s no limit to the number of variations you can create, making it easy to track your character’s development across different timelines, flashbacks, or transformations.
- Reusing Characters Across Stories
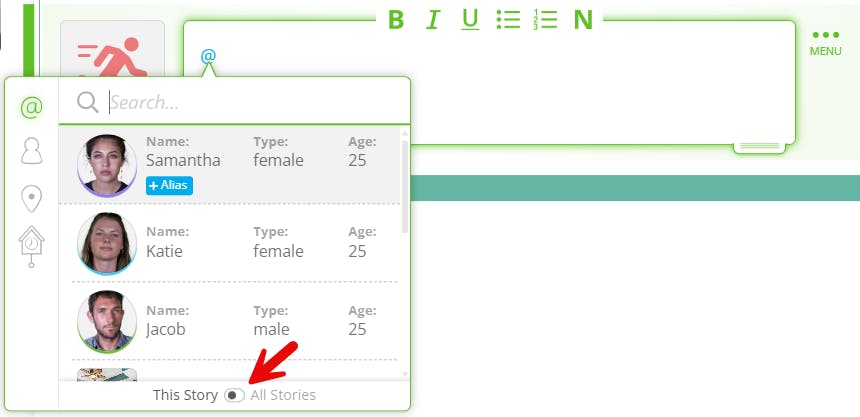
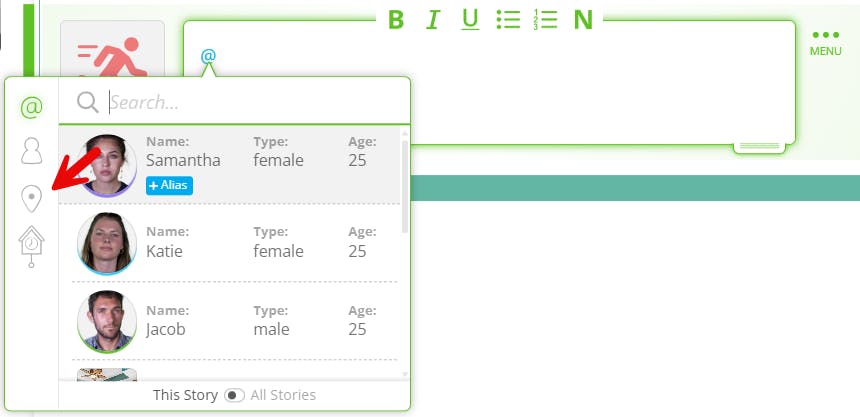
With SoCreate, you can easily access and reuse characters and locations across all your story projects, making it perfect for building series, sequels, prequels, and other connected narratives. Use the Quick Add tool to bring an existing character or location into your current story.
From within your Story Stream, press CTRL + Enter to open the Quick Add window. At the bottom of this window, toggle the “This Story / All Stories” switch to “All Stories.” This action makes every character and location in your SoCreate account searchable.
To find the asset you want to use, start typing the first few letters of the character or location’s name. The list will filter down automatically. Once you see the one you need, either tab to it or click it, then press Enter to add it directly into your Story Stream.
Locations
- Add Location
To add a location to your story in SoCreate, head to the Tools Toolbar on the right-hand side of your screen and click “Add Location.” A pop-out window will appear where you can enter key details, including the location name, an optional description, whether the scene takes place inside or outside, and the time of day.
Next, click “Change Image” to select a visual that represents your location. You can filter the image library by collection or using descriptive tags to narrow down your search. Once you’ve found the perfect image, click “Use Image” to confirm your selection. Then, click “Add Location” to finalize the addition. The new location will now appear in the header of a new scene, helping visually anchor your story for both you and your readers.
- Creating Quick Add Locations
Use SoCreate’s Quick Add feature to quickly add new locations or @mention existing ones directly within your script. To begin, type Shift + @ to open the Quick Add menu. From there, tab down to the location you want to reference, and select it to insert it into your script.
If you need to create a new location, type Shift + @ again, then click or tab to the Location icon in the sidebar of the popout.
Enter the location’s details, including its name, whether the scene takes place inside or outside, the time of day, and an optional description. Describing your location, as you envision, allows our AI production studio to create accurate imagery. Your new location will be added to the Story Toolbar for future use and will appear highlighted in the Dialogue or Action Stream Item where it was first mentioned.
- Tag Locations
To tag a location, navigate to the relevant location or action stream item and type the Shift + @ on your keyboard. A dropdown will appear showing all available locations, select the one you want, and the name will appear in blue text.
Using @ mentioning for locations signals to our AI that the action image may need to take place in that specific setting. Tagging locations also helps ensure consistent visual representation of your locations throughout your story when it's published in Storyteller.
- Edit Location
There are two easy ways to edit locations in your SoCreate story, either directly from the location pinned at the top of a scene or from the saved locations in your Story Toolbar. To edit a location from the Story Toolbar, hover over the desired location and click the three-dot menu icon, then select “Edit Location.”
A pop-out window will appear, allowing you to change the location’s name, update or add a description, and swap out the location image.
If you want to modify scene-specific details, such as whether the scene is set inside or outside or the time of day, you can do this from within your Story Stream. These options help you match the setting to your narrative’s needs more precisely.
You can also edit a location directly from the header of a scene where it’s pinned. Click the three-dot menu icon and select “Edit Location.” From the pop-up, you’ll again have the ability to change the location name, adjust or add a description, and choose a new image if needed. Your updated location will now be reflected in both the Location Stream Item within your Story Stream and in the Story Toolbar, ensuring consistency across your entire project.
- Location Variation
The Location Variations feature in SoCreate allows you to create multiple visual versions of a single location, helping streamline your Story Toolbar while giving you full control over how that location changes throughout your story. Variations are nested under the main location in the toolbar but function independently within your Story Stream; they can be tagged, referenced, and used just like any other location.
When you publish your story to Storyteller, location variations allow your locations to transform accurately, enhancing the visual experience for your audience. Take Back to the Future, written by Bob Gale and Robert Zemeckis, for example. The same town square appears across different eras: 1885, 1955, 1985, and 2015. With Location Variations, you can capture the unique look of each time period while SoCreate maintains an underlying understanding that the location is the same.
To add a location variation, locate the three-dot menu icon either directly on a location within your Story Stream or by clicking the blue “i” icon on the location in your Story Toolbar. From the dropdown menu, select “Add Variation.” You’ll then be prompted to name your variation and update the location image to reflect the new version. Once finished, click “Save Location Variation.”
The new variation is now ready to use. You can access it quickly using the Quick Add feature (by pressing CTRL + Enter in the Story Stream), or by clicking the three dots that appear beneath the original location in the Story Toolbar. You can create as many variations as needed to reflect changes in your story’s setting.
Props
- Create a Prop
To add a prop in SoCreate and ensure it maintains a consistent appearance throughout your Storyteller story, especially when using SoCreate’s AI production tools, use the Quick Add feature for a streamlined workflow. Begin by typing the Shift + @ on your keyboard from within your Story Stream. Then, either tab down to or click the clock icon in the Quick Add menu.
Type in the name of your prop, and optionally, add a detailed description to help with more accurate AI image generation later on. Once you’ve entered the information, click “Add Prop.” The prop will now be tagged directly within your dialogue or action stream item.
To tag the same prop in future stream items, press Shift + @ again to bring up the Quick Add menu. Start typing the first few letters of the prop’s name to filter the list, then arrow down or click the correct prop, and press Enter to insert it. This process helps you keep props consistent and well-documented throughout your entire script.
- When to Use Props
Props in SoCreate keep important, recurring items consistent throughout your story. If an object appears multiple times, creating a prop helps ensure its visually and descriptively consistent every time it’s mentioned. This lets you define exactly what the prop looks like and maintain that vision across your entire script.
More Quick Add items
- Structure
To quick add anything from the Tools Toolbar without using your mouse, hold down the Control key and press Enter. Then, press Tab and review the options to see what you're looking for.
- Action
To quick add an Action item, hold down Shift and Enter at the same time. A new Action item will appear beneath your focus indicator.
Action vs Dialogue
- Add Action
To add action to your story in SoCreate, navigate to the Tools Toolbar on the right-hand side of your screen and click “Action.” A new action item will appear exactly where you’ve left your Focus Indicator in the Story Stream. (FYI: The Focus Indicator is a green bar highlighting your current place in the Story Stream.)
Action items describe anything in your story that isn’t character dialogue. Use them to write scene description, character description, and guide the flow of your narrative between moments of speech.
- Action Duration
The Action Duration tool in SoCreate allows you to manually adjust how long an action is intended to take on screen, giving you more control when automatic timing doesn’t quite match your vision. To adjust an action’s duration, click into the Action Stream Item you want to edit. You’ll see a clock icon in the bottom left corner. Click it to open the timing options. From the dropdown, switch from Automatic to either Seconds or Minutes, then type in your desired duration. Click “Set Duration” to apply the change.
Once updated, a timing note will appear in the lower right corner of the action stream item, showing the new screen time length. This custom duration will be factored into your story’s overall screenplay timing, helping ensure pacing and scene flow align with your creative intent.
- Add Dialogue
To add dialogue from a character you’ve already created in your SoCreate story, navigate to your Story Toolbar on the left side of your screen. Here, you’ll see a list of all your existing characters. Click on the character you want to use, and a new Dialogue Stream Item will automatically appear in your Story Stream, directly beneath where your focus indicator was last placed.
Type in the dialogue you’d like the character to say. When you’re finished, simply click anywhere outside the dialogue item to finalize the change.
- Dialogue Direction
To add more context to how a character delivers a line in SoCreate, you can include dialogue direction. This optional feature helps convey tone, emotion, or physical behavior, like laughing, crying, or exclaiming, giving readers or actors a clearer understanding of the character’s intent. However, writing experts recommend using dialogue direction sparingly to keep the flow natural.
To add it, click on the Dialogue Stream Item you want to edit. Beneath the item, locate and click the icon showing a person with an arrow. A box will appear above the selected dialogue where you can type how the line should be delivered.
If a version of your character exists that visually matches the emotion or action you've described, their facial expression will automatically update to reflect that direction. Once finished, click outside the dialogue item to finalize the change.
Dialogue direction will also be crucial for conveying how your character delivers their lines in Storyteller. To make sure the emotion comes across as you picture it, such as laughing or crying, be sure to include that in the dialogue direction.

- Dialogue Type
By default, SoCreate sets your character’s dialogue type to Normal, meaning the line is delivered on-camera in a typical speaking manner. However, you can easily customize how the dialogue is delivered to fit your scene more precisely. To change the dialogue type, click into the Dialogue Stream Item you want to edit. In the bottom left corner of the item, locate the Dialogue Type icon. Click it to open a dropdown menu and select the appropriate delivery style. For example, if the character’s line should be heard but not seen on camera, choose “Off-Camera Dialogue.”
Once you've selected, click anywhere outside the stream item to finalize the change. This feature helps fine-tune how each line is experienced, both visually and audibly, once published to Storyteller.

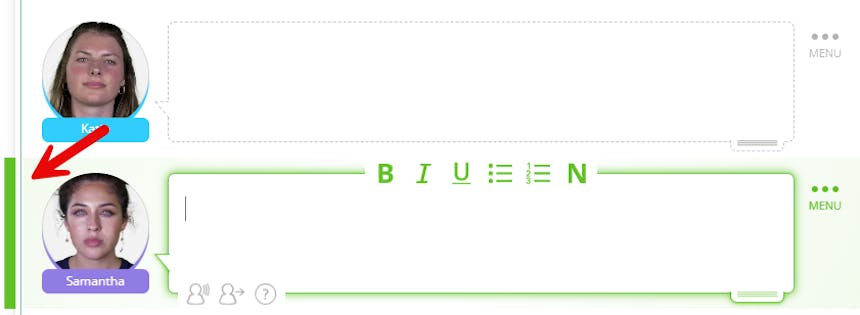
- Focus Indicator
The Focus Indicator in SoCreate helps you keep track of where you are in your story. It appears as a small vertical green bar to the left of your Story Stream and highlights your selected stream item. You can move the Focus Indicator using the up and down arrow keys, or scroll through your Story Stream, and the indicator will follow your movement automatically. This makes it easy to stay oriented, especially when navigating longer scripts.
When you add a new Story Stream item, such as dialogue or action, it will be placed directly beneath the item where your Focus Indicator is currently positioned. So, if you want a new stream item to appear in a specific spot, be sure to adjust the Focus Indicator to that location first. This gives you precise control over the flow and structure of your story.
- Notes Tool
When focused on an action item or dialogue, you can easily add notes. Click into the editor to place your focus indicator on the item, then press the “N.” A notes box will appear, and you can fill in any necessary notes.
Notes will appear in a blue box, so they are easy to spot in your Stream. Notes are private and only visible to you and your collaboration partners. This makes them ideal for tracking sections you want to revisit or leaving thoughts for collaborators. When you go to export your story to a standard screenplay format, your notes will not appear.
Notes from Final Draft files will carry over when imported into SoCreate, and any notes you add in SoCreate will transfer back when exporting to Final Draft.

- Rearranging Items in the Stream
Rearranging your story in SoCreate is simple with our drag-and-drop handles. To move a stream item, navigate to the item you wish to move. Find the drag handle for that stream item in the lower right-hand corner. Click and hold, then drag your mouse to a new location within your story stream. Release the mouse to drop the item in a new place. You can also drag and drop entire acts, sequences, and scenes. Find the scene you wish to rearrange, press and hold the drag handle, and begin to move the story structure item. An outline view will appear. Just release the mouse to drop the story structure item into place.

- Shortcuts
Streamline your writing workflow with SoCreate’s Keyboard Shortcuts, designed to keep your hands on the keyboard and focus on storytelling. To view the complete list of shortcuts, click the SoCreate logo in the upper left-hand corner and select “Shortcuts” from the menu. A panel will open displaying all available keyboard commands.
You can also access this list instantly by pressing the Alt key on your keyboard, which brings up the shortcuts panel. If you use a MacBook, you can get to the list by pressing Control + S on your keyboard. The shortcuts are organized into three categories, App, Story Stream, and In-Editor, many of which are familiar from standard word-processing tools. After reviewing them, click anywhere on the screen to exit the panel and return to writing.
- Collaboration
Collaborate with other writers in real time using SoCreate’s powerful Collaboration feature. To invite someone to join you on a story, click the Collaborators icon in the upper right-hand corner of your screen. A unique link will be generated. Copy this link and send it via email or text to the person you'd like to collaborate with. Remember that all collaborators must have a Professional SoCreate membership to access your story.
Once your collaborator clicks the link, they’ll be taken directly to your SoCreate story, where you can work together seamlessly in real time. To view who currently has access to your story, click the Collaborators icon anytime. This panel will show you who’s been granted access and who’s currently online, and it will give you the option to revoke access or even transfer ownership of the story if needed.
Dashboard
- View Story
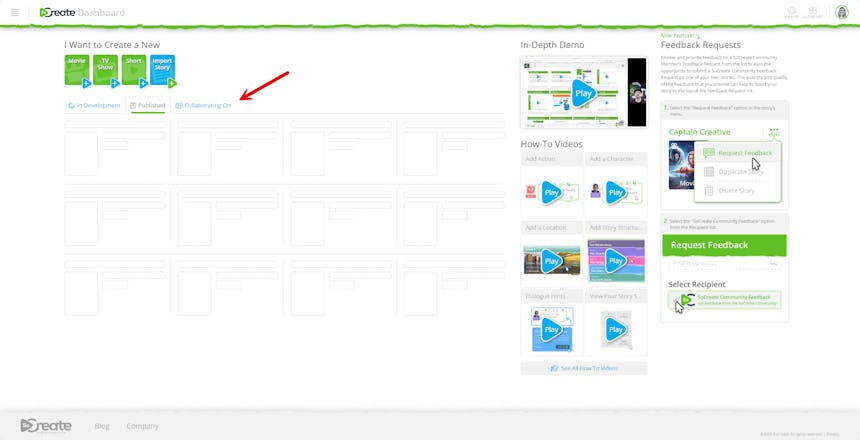
To view and access your SoCreate stories, start at your Dashboard. From the Dashboard, you’ll see three tabs. Your “In Development” tab will include all stories in progress. Your “Published” tab will contain all stories you’ve published in Storyteller. Your “Collaborating On” tab will consist of all stories you’ve been invited to collaborate on by other SoCreate members.
- Support
If you need help using SoCreate, look to the top right corner of your dashboard for the happy face icon. Clicking this icon opens a dropdown menu with three helpful options: How-To Videos, Email Support, and Live Chat. How-To Videos are an excellent resource for step-by-step guidance on every part of the story-building process. If you have additional questions or want to share feedback, you can easily contact a SoCreate team member through Live Chat for real-time assistance or use Email Support for more detailed inquiries.
- Community Feedback Requests
When another SoCreate member gives you feedback on your story via the Community Feedback request, you’ll be instantly notified via email. In the email there will be a link to view your feedback.
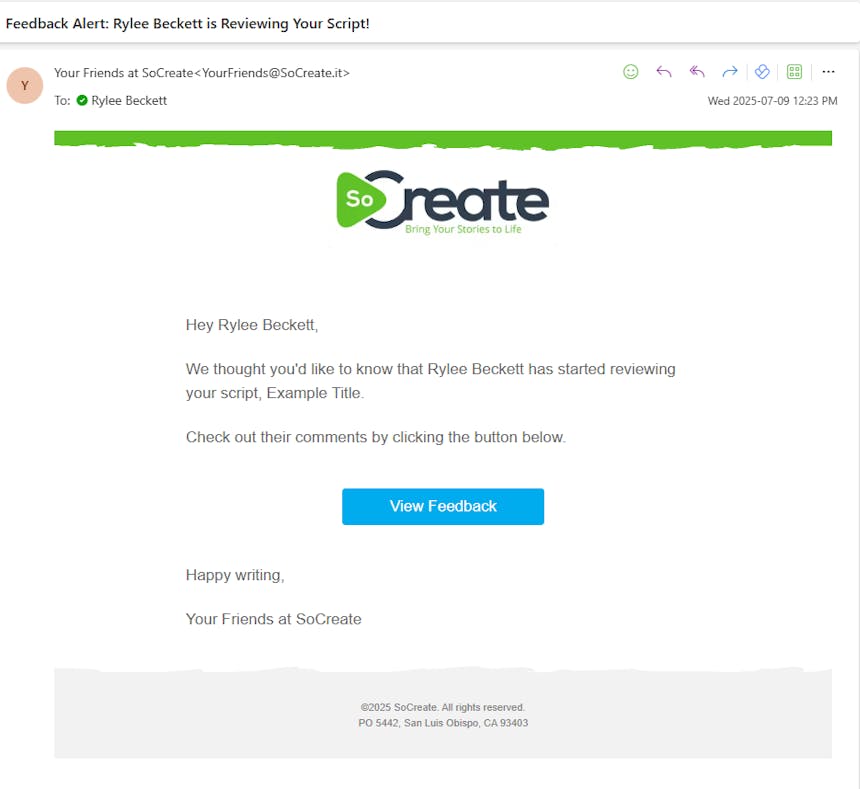
You can also find the feedback under the Collaboration menu item in SoCreate Writer. Just click Collaboration, then View Feedback to find all your feedback in one place.
When requesting Community feedback, keep in mind that it is public, meaning anyone with a SoCreate account can view it. You can request feedback on your whole story, specific scenes, or even a single line of dialogue.
If other members of the SoCreate community request feedback on their stories, you’ll find their requests in the right-hand column on your Dashboard labeled “Feedback Requests.” It’s a shared space where you can give and receive constructive input, helping each other grow as writers and strengthen your stories through collaboration.
- Creator Profile
In the top right corner of your SoCreate Dashboard, you’ll find your account icon. Click on your profile avatar, then select “View Account” to access and edit your account settings. You can update your profile image, view your personas, check your subscription details, and access settings from here.
On the Personas page, you can create different personas to use across your stories, think of them like pen names. Each persona can have its own bio and list of writing experience, helping you personalize how you present yourself to readers. If your persona is set to public, others can view it along with any stories you choose to publish in Storyteller, and it will have its unique public URL. If you prefer to keep things private, you can set your persona to private, meaning no one can view your stories or access your public page.
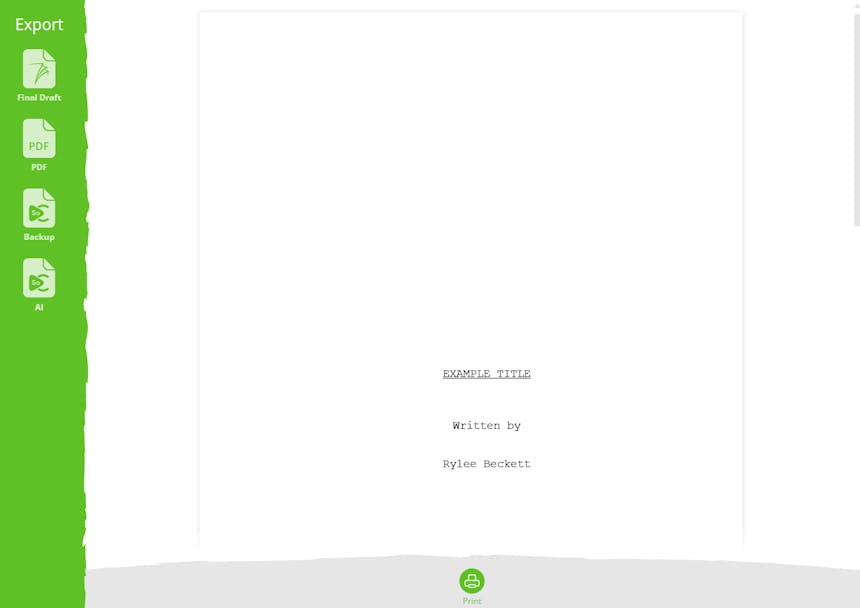
- Export
To export your SoCreate Story to the traditional screenplay format, start by clicking the SoCreate logo in the upper left-hand corner of SoCreate Writer. From the dropdown menu, select “Export/Print.”
A pop-up window will appear, previewing how your SoCreate Story will look in an industry-standard screenplay format. To complete the export, choose your preferred file type from the options, including Final Draft and PDF. Once you've selected, click the file type, and your story will automatically export in that format.
- Publishing
Once you’re ready to bring your story to life, it’s time to publish! In the upper right-hand corner of your story, click “Publish.” You’ll see three options to choose from, select “Publish to Storyteller” to transform your script into an immersive, audio-visual experience.
From there, you can choose to publish your entire story or just a section.
Next, you’ll be prompted to add important story details, including a synopsis, your preferred visual style, narrator’s voice, and the persona you want to be the author.
After that, you’ll select your story’s genre and assign a Motion Picture association rating.
You’ll also have the option to toggle AI Imagery and AI Audio on or off, which will determine the cost of publishing your story. Once everything is set and you’ve agreed to the terms of service, click Publish.
Once your story is done being published, it will appear on the SoCreate dashboard and have a unique URL you can share with others!
We hope this answers all your questions regarding how to use SoCreate Writer.
Happy writing!